Thursday, February 24, 2011

Tea Cakes

I’ve been on a Tea Cake baking spree for the last couple of days.  I don’t know about the rest of the US, but here in the South making Tea Cakes is a long held family tradition.  There are many variations in recipes - some use cinnamon or nutmeg, some use confectioners sugar, some are simply flavored with vanilla.    

Now my husband and I are at totally opposite ends of the spectrum when it comes to Tea Cakes…we have greatly differing opinions on what the flavor and texture should be. 

He grew up eating the Tea Cakes made by his Grandmother.  She rolls them out super thin and bakes them until the edges are lightly browned.  The texture of the outside edges is very crispy, just perfect for dipping in tea, with just a slightly bit softer cookie center.  Her cookies are not very sweet.

For both batches of Tea Cakes, I used my largest size biscuit cutter.  The cookies are approximately 3” in size.

(Tea Cakes like his Grandmother makes)

SANY7215

SANY7212

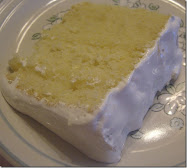
On the other hand, I was raised eating my Grandmother’s Tea Cakes.  She would roll them out and cut them with a glass.  Her Tea Cakes were thicker, but  delicate, cookies with more of a cake-like texture inside.  The entire cookie was soft, much sweeter and subtly flavored with vanilla.

(Tea Cakes like my Grandmother made)

SANY7224 

SANY7220

I’m including two recipe variations for Tea Cakes.  The first recipe produces a thin, crispy cookie like my husband’s Grandmother makes. 

1 cup butter

2 cups sugar

2 t vanilla

3 eggs

4 cups flour

1 t baking soda

2 t cream of tartar

Cream the butter and sugar together until fluffy.  Add the eggs, beating well after each addition.  Add the vanilla.  Sift the flour, baking soda and cream of tartar together, then add them to the eggs/sugar.  Roll the dough about 1/8-1/4” thick and cut with either a biscuit or cookie cutter.  Place the cookies on a greased cookie sheet and bake at 350 degrees for 10 minutes.  Cool on wire racks.  This makes approximately 5 dozen 3” cookies.

This recipe makes soft, cake-like cookies like my Grandmother baked.  The instructions are basically the same as above.

1 c butter

1 1/2 c sugar

3 eggs

3 1/2 c flour

1 t vanilla

Cream the butter and sugar.  Add the eggs and mix well.  Add in the flour and vanilla, mixing well.  Roll the dough 1/4” thick and cut.  Place on a greased sheet and bake at 350 degrees for 10 minutes.  Cool on wire racks.  This makes approximately 2 dozen 3” cookies.

Two recipes, similar ingredients and instructions…yet two totally different Tea Cakes.  Which do you prefer…thin and crispy or soft and delicately flavored?

tea cake collage

I’m joining Miz Helen for Full Plate Thursday.

Thanks for stopping by! 

DG

Sunday, February 13, 2011

A Miniature House Full of Love

I was browsing through my favorite antique shop a couple of weeks ago and spotted  a handmade dollhouse.  For a long time now I’ve wanted a dollhouse, but I never really had the time to make one from a kit when I was working. 

According to the owner of the shop, it was full of furniture when she purchased it, but she kept the furniture for her grandchildren.  Based on the style of furniture and people in the house, she felt like the house was built sometime during the 1950’s.  We really have no way of knowing for sure though.

Dollhouse when I first received it - front exterior view

SANY7124

The dollhouse is in pretty rough shape – it’s very dirty, there are missing shutters and trim pieces, super ugly faux wood contact paper for the flooring, and the roof needs serious help.  I came home and told my husband about it and how I would love to be able to restore it. 

Well, guess what I received yesterday for an early Valentine’s Day gift!  My wonderful husband bought the dollhouse for me…he’s such a sweetie!

View of the first and second floors

SANY7121

Now looking at the photos, you may be thinking “what a hideous Valentine’s Day gift”!  My sweet husband knows me too well though…I love to take things that others might think is junk and breathe new life into them.  Underneath all the problems the house has right now, I can see the hidden beauty just waiting to shine through. 

Bottom of the hinged roof lifts up for a view of the attic space.

SANY7122

The first step will be to restore the exterior of the house.  I’ll be putting new shingles on the roof and the house will get a new paint job and probably new clapboard siding.  My husband will make shutters and trim to replace the missing pieces.  We sat down this afternoon and designed a new porch that we’ll be building for the front of the house.

Exterior side view

SANY7128

Since I have to wait until I get the shingles to really get started, I spent four hours last night ripping up the contact paper flooring simply cause I was so excited and just had to start something!  Tomorrow, the house will be getting a thorough cleaning inside and out.  I probably should have done that first, but that paper was just calling my name and saying “rip me out please!”

Staircase on the first floor

SANY7129

I wish I knew who built the house and who the lucky little girl was that owned it.  I can just imagine she spent many happy hours playing with her dolls and all the wonderful furniture the house would have contained.

Interior view after removing all the contact paper from the floors and stairs.

SANY7133

I know I’m going to love owning it now and bringing it back to life!  I’m joining Susan at Between Naps on the Porch for Metamorphosis Monday.

DG


Sunday, February 6, 2011

I Greet Thee My Valentine

SANY6984

Today I’m sharing my kitchen decorated for Valentine’s Day.  I used lots of prints of vintage Valentines and candy to decorate the room. 

I’m joining in with Mary at Boogieboard Cottage for Masterpiece Monday, Karen at The Graphics Fairy for Brag Monday, and Marty at A Stroll Thru Life for Table Top Tuesday

Along with candy and Valentine prints, I added a vintage plate, a small cherub and sugared roses to this vignette in the corner of my counter.

SANY6987

A vintage Valentine print decorated with glass glitter.

SANY6985

I was browsing through my favorite antique shop last week and the owner’s daughter was planning to have a yard sale this past weekend.  She had many of the items for the sale stored in the antique shop.  This gumball machine was one of the items and I bought it for a whopping price of $1.00!  It has copyright 1985 Carousel stamped on the metal key and is almost in perfect condition.   My grandsons are gonna love it!

Can you see how the Valentine print sparkles?  I love using German glass glitter to add a little bling!

SANY6982

My Hoosier cabinet is the main candy station in the room.  Apothecary jars and candy dishes are filled with chocolate pretzels, candy conversation hearts, Hershey kisses and other candy. 

SANY6964

I found the heart graphics and the idea to make the garland at The Graphics Fairy.

SANY6941

I added a Cupid candleholder…

SANY6909

…and a Cupid figurine.

SANY6967

Although you can’t see it very well, there is a key, as in “key to my heart”, hanging from a sheer ribbon on the lid of this candy dish.

SANY6968

This is another Valentine graphic that I found at The Graphic Fairy.  A little glass glitter, a silver frame…and it’s ready to look pretty!

SANY6917

A “chocolate” mug from Dollar General is filled with Valentine lollipops.

SANY6993

A closeup of the heart garland…

SANY6933

A shot of the entire cabinet…

SANY6995

This is my island with more decorations.

SANY6975

I used a wooden tray to hold a vignette on one end of the island.

SANY6971

This Valentine print was another find at The Graphics Fairy.  I’m not crazy about how I cut this one out, so I’ll probably print another one and start over.

SANY6955

The silver trays and the pink floral heart are recent thrift store finds.

SANY6999

The other end of the island has my cookie jar, a cloche and a pink heart candy bowl.

SANY6974

The cloche holds one of my favorite graphics from The Graphics Fairy.  I think the little angels are so precious and I love the dove.

SANY6960

I added in pink Valentine heart picks and silk roses.  Although you can’t see much sparkle, this print also got a dusting of glass glitter.

SANY6961

The chocolate plate and card holders were also found at Dollar General.

SANY6977

Another photo of the island…

SANY6976

I had so much fun playing around with decorating this room!  I’m really glad you stopped by today and I hope you have a wonderful Valentine’s Day!

DG

Images of Vintage Valentines

I wanted to learn to make mosaics using photos, so I’ve been playing around with the prints of vintage Valentines that I used to decorate my home.  The mosaic was actually quite easy to make following the instructions given by Mary at Little Red House.

I love using vintage graphics to decorate for different occasions.  The great thing about using them is that it costs very little (basically just paper and ink!) and I think they add instant charm to vignettes. 

I also use vintage graphics, often postcards, to make place card holders for my table settings.  The place cards are super easy to make and really fun!

valentine mosaid

I’m linking up with Mary for Mosaic Monday.  Thanks for stopping by!

DG

Friday, February 4, 2011

Pink Lace and a Cherub

It’s cold and rainy today…a perfect day to stay at home and play with an early Valentine’s Day tablesetting.  I’m linking up with Susan at Between Naps on the Porch for Tablescape Thursday.  I’m also joining Laurie’s Valentine Party.

SANY7000

I began by layering a white lace tablecloth over a pink damask one.  I also used matching pink damask napkins layered under the salad plates.

SANY7020

I wanted to keep the setting very simple to showcase the Victorian cherub bride’s basket that I used for my centerpiece.

SANY7009

SANY7002

I filled the bowl with pink and white silk flowers, valentine picks and a creamy strand of pearl garland.

SANY7010

I love the coloring in the basket.  The ruffled opalescent green edges cut to pink diamond point glass as it curves down the bowl. 

SANY7059

My absolute favorite set of chargers, gold baroque ones, highlight the gold scrolled design on the bread and butter plates and the gold trim on the dessert underplates.  I placed a small crystal bowl and silver butter spreader on each bread and butter plate. 

SANY7007

The china pattern is “English Rose”.  I love the shades of light and dark pink with hints of white in the roses.

SANY7006

Layered on top of the salad plates are white dessert underplates trimmed in gold and topped with depression era pink satin glass dessert bowls.

SANY7004

A pretty satin finish heart tied with white iridescent ribbon rests in each bowl.

SANY7005

The whole place setting…

SANY7003

Stemware is “Heritage” by Fostoria.

SANY7011

Crystal knife rests are placed at each setting.

SANY7018

I added crystal cruets for salad dressing and salt and pepper shakers.

SANY7014

SANY7015

Dinnertime and the candles are softly burning.  The candelabrum are antique brass with an ornate baroque design.  I like how they look with the bride’s basket.

SANY7029

SANY7023

SANY7022

I’m so glad you stopped by to visit with me for a while and I hope you’ll come back soon!

I hope your Valentine’s Day will be filled with lots of love…and of course, a box of chocolates would be wonderful too!

DG